The Contacts database is the heart of Data Manager. Once you have customised any required Templates, Letters and Action Plans you will spend the majority of your time in the Contacts database entering data, editing data and searching/finding. Once you have setup your contacts and classified them you can then communicate with them via email, SMS/TXT messages and mail merge letters and record important notes about them as you go. You can also create activities associated with each contact that prompt you to make contact with them in a future date which will appear in your To Do List.
To open the Contacts database:
1. Go to the Data Manager Home Screen.
2. Click the Contacts button.
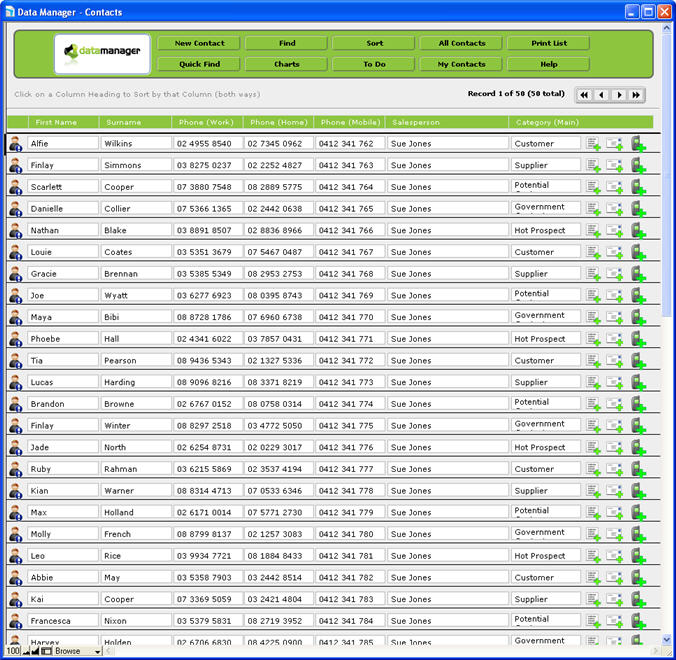
3. You will be presented with a list of all the contacts in your database. If you chose to let Data Manager create 50 sample Contact records during the Data Manager Solo or Trial version installation you will already have 50 sample records in your Contacts database, otherwise this will be empty.
If this is the first time you have opened Data Manager and you did not import the 50 sample records then the list will be empty. You can either enter your Contacts in one by one if you might be able to import them from your current contact database application (e.g. Microsoft Outlook or Excel). Please refer to the chapter Importing Contacts into Data Manager for details on importing Contacts into Data Manager.
4. To view the full details of an existing contact click the Person
Icon to the left of the First Name column: ![]() . You
will now be viewing the full details for the selected Contact:
. You
will now be viewing the full details for the selected Contact:
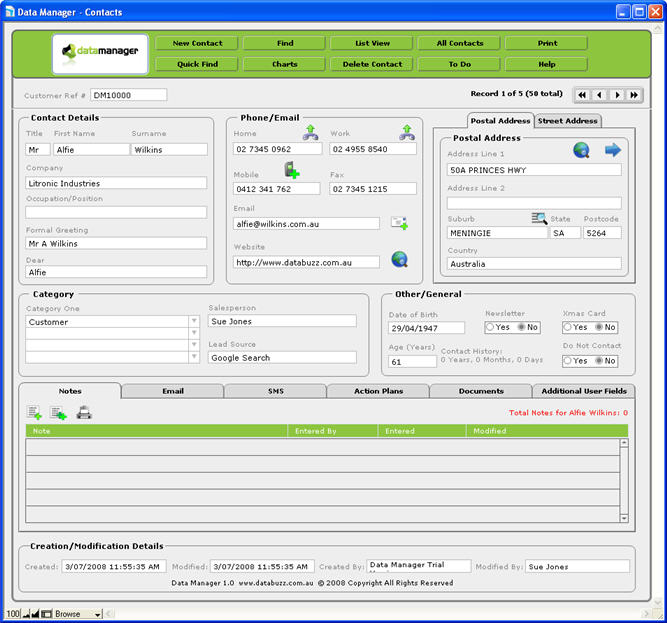
This is the main details screen where you can view, enter and edit details for each Contact in your database.
As mentioned in the Navigation Tips section Data Manager displays the total number of records for the database that you are currently in the top right hand corner of the screen.

There are also navigation buttons that you can use to go to the First Record in the current found set of records, the Previous record, the Next Record and the Last Record. For example using the screenshot below this tells us that there are 50 records in total in the database we are viewing, but you are only able to view the group of 5 of those 50 at the moment as you might have done a find to view a subset of the database (e.g. all potential customers). Furthermore you are currently viewing Record 3 of the 5 found records, so clicking the double left arrows will take you to record 1 out of the 5 you are viewing, clicking the single left arrow will take you to record 2, clicking the single right arrow will take you to record 4 and clicking the double right arrows will take you to record 5.
Navigation Button Actions
|
Icon |
Action |
|
|
Go to the First Record in the Current Found Set of Records |
|
|
Go to the Previous Record to the current record you are viewing/selected |
|
|
Go to the Next Record to the current record you are viewing/selected |
|
|
Go to the Last Record in the Current Found Set of Records |
There are 10 green buttons across the top of the Contact details screen which perform the following tasks:

New Contact - click this button to create a new Contact in your copy of Data Manager. Data Manager will automatically check for any existing/duplicate Contacts with the same name as the one you are creating.
Find - this will clear your screen and put you in Find mode and allow you to search for a contact/s. For instance, to find all buyers, click on the Find button, select ‘Yes’ in the Buyer field and press Enter (or select the grey Find button to the left of the screen). All your contacts with ‘Yes’ selected in the Buyer field will be grouped together.
List View - view a summary list of the selected found set of Contacts you are viewing/working with.
All Contacts – finds all Contact records in your copy of Data Manager (this will undo the last Find you did).
Print - prints the details for the current Contact you are viewing. See the Printing Tips for more information on printing from Data Manager.
Quick Find - allows you to quickly search for a Contact by their Name, Phone Number, Address or Email Address.
Charts - opens the Google Charts viewer where you can generate a number of pre-defined pie charts (Contacts Lead Source, Contact Category, Contacts Salesperson, Contacts Age, Contacts Suburb).
Delete Contact – deletes the current Contact you are viewing (note you must Master Access Privileges in order to delete a Contact). Once you delete a Contact it is permanently deleted and cannot be retrieved except from a backup copy. Deleting a Contact will also delete all Notes, Emails, SMS/TXT Messages, Action Plans and Documents for the selected Contact you are deleting). See the section on Access Privileges/Levels for more information on the differences between the Access Privileges in Data Manager.
To Do - view your To Do List (shows any activities that you are due to perform today).
Help - view the Data Manager Online Help in a web viewer within Data Manager.
There are 6 grey tabs across the bottom section of the Contact details screen which perform the following tasks:
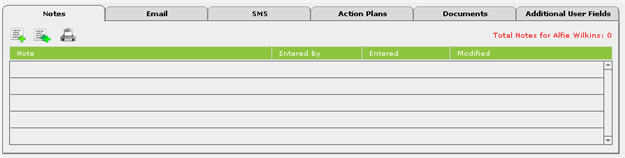
Notes - click this tab to view any notes for the current Contact you are viewing, and to create a new note for the current Contact or a bulk note for all Contacts in your current found set. You can also print all notes for the current Contact you are viewing. See the Recording Contact Notes section for more information.
Email - click this tab to view any Emails that have been sent to the current Contact you are viewing, and to create a new Email to the current Contact or a bulk Email to all Contacts in your current found set. See the sections on sending an email to a single contact or a bulk email to a group of contacts for more information.
SMS - click this tab to view any SMS/TXT Messages that have been sent to the current Contact you are viewing, and to create a new SMS/TXT Message to the current Contact or a bulk SMS/TXT Message to all Contacts in your current found set. See the sections on sending an SMS to a single contact or a bulk SMS to a group of contacts for more information
Action Plans - click this tab to view any Action Plan activities that have been set to the current Contact you are viewing, and to create a new Action Plan or single activity to the current Contact or a bulk Action Plan or single activity to all Contacts in your current found set. You can also print all Action Plan activities for the current Contact you are viewing. See the Setting Action Plans Against a Contact section for more information.
Documents - click this tab to view any linked Documents that have been entered for the current Contact you are viewing. See the section on Linking External Documents to a Contact for more information.
Additional User Fields - click this tab to view the Additional User Fields for the current Contact you are viewing. See the section on Using the Additional User Fields for more information.


