Data Manager allows you to quickly and easily import data into the Contacts database using the supplied Microsoft Excel spreadsheets. We strongly recommend using the supplied Microsoft Excel spreadsheets as these have the correct column headings across the top of each row that match up to the field names in the Data Manager Contacts database. There are 2 Microsoft Excel spreadsheet templates that are supplied with Data Manager:
Contacts Import.xls – this can be used for any data that is in Excel format and has the correct column headings across the top in the first row that correspond to the fields in the Data Manger Contacts database. There is a sample row to illustrate what goes in each column.
Microsoft Outlook Contacts Import.xls – this can be used when exporting data from Microsoft Outlook and importing into Data Manager. Typically a user would insert a row at the top of their exported outlook excel spreadsheet and copy/paste the top row from this spreadsheet.
You can find these in your Data Manager folder on your computer. For example for Windows Data Manager Solo or Trial version users these can be found at:
C:\Databuzz\Data Manager\Data Manager 1.0\Excel Spreadsheets
You can also download these spreadsheets from:
http://www.databuzz.com.au//data_manager/downloads/excel_spreadsheets.zip
Once you have updated the Excel spreadsheets with your data you can import this into the Data Manager Contacts database as follows:
1. Go to the Data Manager Home Screen.
2. Click the Contacts button.
3. Go to the Scripts menu at the top of the screen and select Import Contacts>Import New Contacts into Data Manager.
4. Navigate to the folder containing the Excel spreadsheet you wish to import. You may need to select ‘All Files (*.*)’ from the Files of type menu at the bottom of this dialog box.
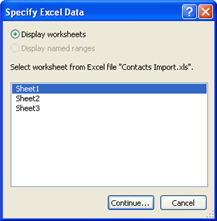
5. Select your spreadsheet and click Open. You might need to select which worksheet contains the data to be imported. If you are using one of the supplied Excel templates select Sheet1 and click Continue:
6. The Import Field Mapping dialogue box should appear:
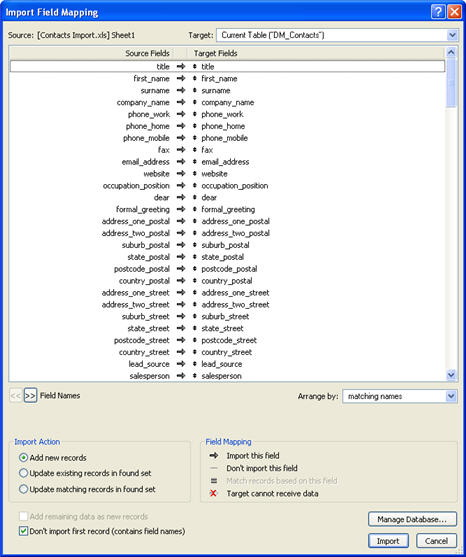
Make sure Matching Names is selected from the Arrange by: drop down menu in the middle on the right hand side - this will ensure all columns with the correct column heading will be imported into the field with the same name in Data Manager (otherwise you will have to manually map the Excel columns on the left of the screen with the Data Manager Contacts fields on the right of the screen). Make sure Add New Record is selected under Import Action and the Don't Import first record (contains field names) is ticked in the bottom left hand corner and then click the Import button.
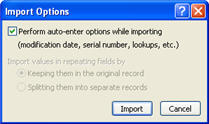
7. In the next Import Actions dialogue box, make sure there is a tick for Perform auto-enter options while importing and click the Import button.
8. Your data will now be imported. An Import Summary dialog box will appear when the importing has finished alerting you to the total number of records that were created and whether there were any errors during the import. One new Contact record will be created for every row in the Excel spreadsheet.
Your imported group of records automatically becomes the new current found set so if there are any bulk actions that need to happen (e.g. classifying all imported records or making a note for all imported records) now is the only chance you will have to easily perform bulk actions. Otherwise you can view each record and edit as required.