Once you have entered your SMTP Outgoing Mail Server Address details into Data Manager you are ready to start sending Email messages to one or more Contacts in your Data Manager Contacts database.
Important: make sure you have entered your email address in the My Account settings, as this is required to send an Email Message from Data Manager.
To send an Email Message to a single Contact from your Data Manager Contacts database:
1. Go to the Data Manager Home Screen.
2. Click the Contacts button.
3. Locate the Contact you wish to send the Email Message to and click the Person Icon to the left of their First Name. You will now be viewing the full details for the selected Contact. See the section on Searching the Contacts database for instructions on how to find a Contact.
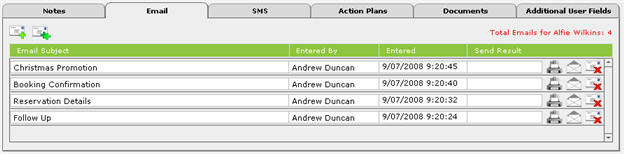
4. Click the Email tab - this displays any Email Messages previously sent to this Contact:
5. Click the Icon under the Email tab with
the single green plus button  to create a new Email Message
to the selected Contact.
to create a new Email Message
to the selected Contact.
Tip:
you can also click the button when viewing the Contacts
List View to the right of the Contact you wish to send the Email Message
to.
You will be taken to the Email Message screen where you enter and send your Email Message:
![]()
This is where you enter the actual text of the Email Message you wish to send or select one of your existing Email Templates. The fields in this screen are as follows:
Email To: Data Manager automatically inserts the name of the Contact you are sending the Email Message to
Email Address: Data Manager automatically inserts the email address from the Contacts database that you have entered
CC Email Address: you can enter a Carbon Copy Email Address for this Email Message here. Note: the list of CCed recipients is visible to all other recipients of the message
Email From: the Data Manager User Account Name that will be used as the sender of the Email Message. Data Manager automatically enters the current User Account Name - if you wish to change this for the Email you are about to send you can select a different User Account Name from the drop down value list. Replies to this Email Message will go to the selected User Account Name's email address.
Sender's Email Address: Data Manager automatically inserts the email address of the sender from the User Accounts section.
BCC Email Address: you can enter a Blind Carbon Copy Email Address for this Email Message here. Note: the recipients listed in the BCC field receive a copy of the message but are not shown on any other recipient's copy
Email Message Subject: enter the Subject for this Email Message
Email Message: this is where you can type in the text of the message you wish to send (similar to sending an Email from your other Email application like Microsoft Outlook, Outlook Express, Apple Mail or Microsoft Entourage).
Select Email Template: this displays a list of your current Email Templates that you have setup in the Templates database. If you want to use on of your preset Email Templates simply select the required Email Template from the drop down value list and it will be inserted into the Email Message field automatically, deleting any text that was previously entered
Email Attachments: this lists any attachments you wish to include with this Email Message. Click the Add Attachment button to add an attachment. If you want to add more than one attachment simply click the Add Attachment button for each additional attachment that you require. Click the Clear Attachment to clear all attachments. Clicking the View Attachment will open the first attachment to this Email Message in it's native application.
Email Send Result: this displays the result returned by your SMTP Outgoing Mail Server when you send the Email Message. You can use this along with the Email Transcript to determine the success or failure of each Email Message that you send.
There are also 2 green buttons on the right hand side of the screen that perform as follows:
Check Spelling: click this to perform a spell check on the Email Message text before sending
Send Email: click this to send the Email Message (you must be online connected to the Internet)
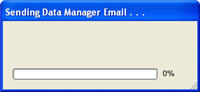
Once you have entered your Email Message or selected one of your Email Templates and have spell checked your message click the Send Email button to send your Email Message to the SMTP Mail Server. This usually takes a few seconds and a progress bar will appear on the screen whilst Data Manager is trying to submit the Email Message to SMTP Mail Server indicating the sending status:
Once you have sent your Email Message you will receive a response from the SMTP Mail Server which will appear in the Email Send Result field. If your Email Message was successfully submitted to your SMTP Mail Server you will get the following in the Email Send Result field:
Email Sent Successfully.
You can view the full details about the transmission of the Email Message by clicking the Show Email Transcript button which will display the full Email transcript that is returned from your SMTP Mail Server as follows:
![]()
If you are having problems sending Email Messages from Data Manager you will probably need to supply your IT person or network administrator a copy of the transcript so they can review this to help determine the cause of problems you are having sending Emails from Data Manager. You can either print this or copy/paste the text of the transcript into another application as required. Click the Close button to close the transcript window.
When you have finished sending your Email Message click the green Contacts button at the top of the screen to return to the main Contacts database. You will now see the new Email Message that you have just created and sent appearing in the list of Email Messages to the selected Contact. To the right of each Email Message are 3 buttons that perform as follows
 - click this button to deleted
this Email Message (Once you delete a Email Message it is permanently
deleted and cannot be retrieved except from a backup copy that you have
previously made of your copy of Data Manager. See the Backups
section for information on backing up Data Manager). When you delete a
Email Message in Data Manger you are presented with a warning dialog box
confirming that you wish to delete this Email Message, allowing you to
cancel the deletion in case you accidentally clicked this button. You
can bypass the confirming dialog box by holding down the SHIFT key when
pressing the delete button.
- click this button to deleted
this Email Message (Once you delete a Email Message it is permanently
deleted and cannot be retrieved except from a backup copy that you have
previously made of your copy of Data Manager. See the Backups
section for information on backing up Data Manager). When you delete a
Email Message in Data Manger you are presented with a warning dialog box
confirming that you wish to delete this Email Message, allowing you to
cancel the deletion in case you accidentally clicked this button. You
can bypass the confirming dialog box by holding down the SHIFT key when
pressing the delete button.
 - click this button to View
the selected Email Message
- click this button to View
the selected Email Message
 - click this button to Print
the selected Email Message
- click this button to Print
the selected Email Message
The total number of Email Messages for the Contact you are viewing also appears on the right hand side of the Email tab in red:
