Data Manager has a powerful mail merge feature that allows you to mail merge with Microsoft Word (the mail merge feature of Data Manager requires a copy of Microsoft Word to be installed on the computer performing the mail merge. Microsoft Word is not included with Data Manager and must be purchased separately). We recommend that you use Microsoft Word 2000 or later.
You use the Mail Merge feature when you want to create a set of letters to multiple customers that are essentially the same but where each letter contains unique elements. For example, in a letter that announces a new product, your company logo and the text about the product will appear in each letter, and the address and greeting line will be different in each letter.
Data Manager installs 17 sample Microsoft Word letter templates including Avery mailing label templates. These are intended as a guide to show you what a sample letter might look like - you most likely already have your own letter templates that you would rather use. If you are planning to use the mail merge feature of Data Manager one of the first tasks in setting up Data Manager is to customise the supplied mail merge letters. To customise one of the supplied letter templates:
1. Go to the Data Manager Home Screen.
2. Click the Letters button. A list of the supplied 17 letters will appear.
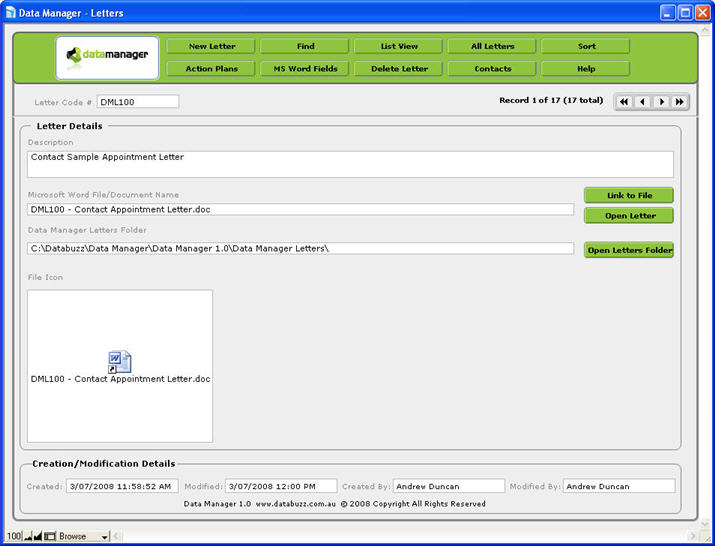
3. Click the Letter Details button to the right of the screen to view more information about each letter. You will a screen displayed as follows:
The Letter Details screen displays full details about a particular letter, including a description of the letter, the Microsoft Word File/Document Name and the location of the Data Manager Letters Folder.
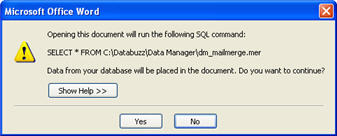
4. To view the letter click the Open Letter button to open the letter in Microsoft Word. If you get the following Microsoft Word warning box warning about an SQL command always select Yes.
You can disable this SQL warning box by following the instuctions found in the Microsoft Knowledgebase at:
http://support.microsoft.com/kb/825765
You can then make any changes that you require to the letter (just as you would with any other Microsoft Word document). When you have finished making you changes click the Save button in Microsoft Word and close the letter. You can repeat this process for other letters that you wish to customise.
A mail merge in Microsoft Word is comprised of 2 components: the data source file containing the list of names and addresses to send the letter to and the main document containing the letter template that is the same for all recipients.
Mail Merge letters get the data to merge into the letter from a data source file which is generated by Data Manager every time you print a letter from your To Do List. This data source file contains a list of the merge fields available to Microsoft Word - you can see the list of available merge fields by clicking the MS Word Fields button in the Letters database. The data source file is generated by Data Manager in the following location:
Windows: C:\Databuzz\Data Manager\dm_mailmerge.mer
If you are planning on creating additional Mail Merge letters in Data Manager you will need to know this location of the data source file. You can get more information about the Microsoft Word Mail Merge process from the Microsoft website at:
http://office.microsoft.com/en-us/help/HA010349201033.aspx
Data Manager comes with 5 spare mail merge letters that you can customise to suit your needs. If you require more than this you can always add an unlimited number of additional letters as well. We do recommend first using the supplied spare letters if you would like to add your own customised letter to Data Manager.
To customise one of the supplied spare Contact letters:
1. Go to the Data Manager Home Screen.
2. Click the Letters button. A list of the supplied 17 letters will appear.
3. From the list, locate one of the spare letters (e.g. Contact Spare Letter 1) and click the Letter Details button to the right of this letter.
4. To view the letter click the Open Letter button to open the letter in Microsoft Word and make any changes you require (just as you would with any other Microsoft Word document). If you get the following Microsoft Word warning box warning about an SQL command always select Yes:
You can disable this SQL warning box by following the instuctions found in the Microsoft Knowledgebase at:
http://support.microsoft.com/kb/825765
5. You can use the Mail Merge toolbar to preview how your letter will appear with customer details in place of the merge fields. Click the View Merged Data (<<ABC>> icon on the toolbar in Word 2000/2003/XP or the Preview Results button in Word 2007) to switch between editing and previewing how the letter will appear. If you cannot see the Mail Merge toolbar go to the View menu>Toolbars and make sure there is a tick next to Mail Merge.
Mail Merge Toolbar Word 2000/2003/XP

Mail Merge Toolbar Word 2007

6. When you have finished making your changes, click the Save button and close the letter. Note: Make sure you are viewing the merge fields and not a contact’s details before clicking Save.
For more information on working with Mail Merge letters and inserting merge fields consult one of the following:
Your Microsoft Word documentation
The Microsoft Word Online help
This article in the Microsoft Office website.